.JPG) Since
1989
Sales Direct 505-220-1401
Since
1989
Sales Direct 505-220-1401
34th Year Anniversary
Woodworking Machinery Imported from Europe and Asia
Edgebander Glue Pot Adjustment Tutorial Page 2
Continued from Page 1
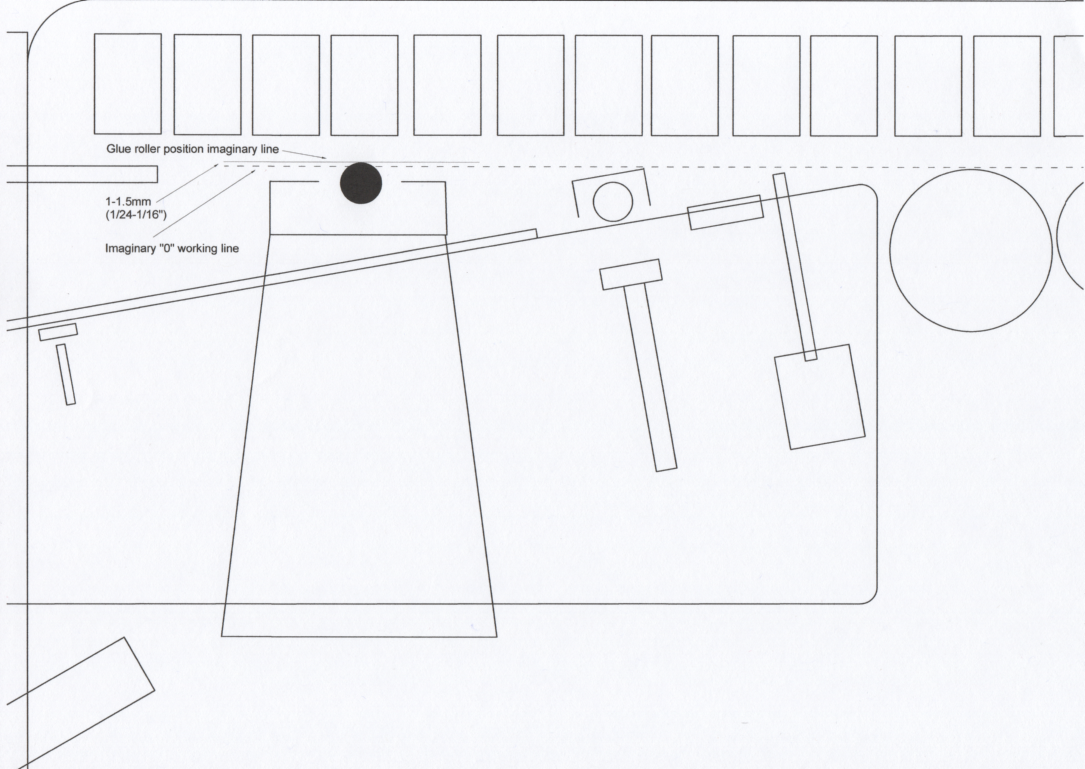
We will discuss the proper distance into the working line of the glue roller, and the pressure on the glue pot and roller at the same time. Please refer to the magnified drawing of the glue pot and roller on this page. You will see looking down from the top that there is a dashed line that exactly lines up with the in feed fence. That is “the zero working line” through the machine. On most machines that fence is stationary and does not move. (On some machines the fence moves to adjust for different edge thickness. On these machines servos control the positioning of the fence and glue pot, so you just have to make sure they are lined up properly as described below.)
We want the glue roller to stick out past the working line about 1-1.5mm (1/24-1/16”). The glue pot will have an adjustment for this somewhere. Some glue pots pivot on a shaft that is off center, and other glue pots move directly in and out of the working line. Either way, you have to find the depth stop and adjust it so that the glue roller sticks out past the zero working line 1-1.5mm or 1/24-1/16”. This can be best viewed by opening up the pressure beam to its maximum height, and standing at the in feed end of the machine, and sighting down the in feed fence and seeing if the glue roller protrudes out past the fence the correct dimension. Once you think you have it close, you can take a straight stick and hold it lightly against the fence and verify that the glue roller is holding the stick away from the fence about 1mm at the most inboard side of the fence. Because the glue pot and roller are spring or pneumatically pressured, this adjustment does not have to be perfect, just close.
Now we have to adjust the pressure. As I said, many glue pots are pressure loaded with spring pressure, but some have pneumatic pressure. Either way, the pressure has to be adjusted to an approximate correct amount. Pneumatically this is probably around 2-3 bar, which is about 28-42 lbs, so some pressure, but not too much. With spring pressure, just adjust by feel. When you are setting the pressure, just take a strong stick, and find a way to carefully pivot or push the glue pot back to check the pressure.
Here are the things to be concerned about when setting the pressure. First let’s understand why we have the glue roller protruding out past the working line, and why we have spring or pneumatic pressure as opposed to a fixed glue pot. The glue roller is out into the line so that glue will be applied to an imperfect panel. If the panel has any warping or cupping at all, whether it be from a bad saw cut, or just from sitting and warping like wood substrates do sometimes, by sticking the roller out past the fence, but allowing it to retract with the right amount of pressure and when you have small imperfections in the straightness of the panel, or even if the piece is not properly held against the fence, the glue will still be applied correctly onto the panel.
So, when you test feed a piece, if the pressure does not hold the glue roller against the piece, the pressure is too light. If when you test feed a piece, the glue roller pushes the piece away from the fence (And hence changes its position in relation to the zero working line) then the pressure is too strong, it’s that simple.
If the pressure is too light, sometimes their will be no glue on parts of the pieces, especially the long ones, and you will get a failure of the edge bond. If the pressure is too heavy, and moves the piece off the fence, then when the piece comes to the presser rollers, it won’t make proper contact with the rollers, and hence your bond will fail, AND, your trimmers through the rest of the machine might move the tape or strip around resulting in a lousy trim job, or they might knock the tape or strip off all together.
There is also sometimes a small plate on the in feed side of the glue roller that might need to be adjusted. It is basically there to keep a production shop from wearing out the glue roller, and helps with controlling the amount of glue applied to the panel. This plate is usually an L shape, and is often bolted with one or two small bolts to the in feed side of the glue pot, and is located just on the in feed side of the glue roller. This plate of course needs to allow the glue roller to protrude past it just a little bit (If it does not, then it will keep the panel from receiving any glue). I find it best to adjust this plate when the glue pot is warm, but not HOT. So, after the glue pot has been to temperature, let it cool down quite a bit, maybe from around 200 Celsius to about 50-75 Celsius. Which is still between 122 and 167 Fahrenheit, so be careful. You can try a little cooler if you want, as long as the screws will easily come loose without breaking or stripping. Sometimes this plate has an adjustment set screw built into it as well, but sometimes it does not. Anyway, it needs to be set so that it allows the glue roller to protrude past it a small distance, I would estimate this at 0.5-0.75mm, or slightly less. So, that would be about 1/50-1/32”.
Now finally, we need to adjust the amount of glue that is actually on the glue roller. The way the glue rollers are designed is that an amount of glue automatically feeds UP the glue roller from the glue pot. (That is unless you have a glue pot above the glue roller). On the in feed side of the glue roller is a gate on a cylindrical shaft that is approximately the same height as the part of the glue roller you can see. By adjusting this GLUE GATE you can control the amount of glue allowed onto the roller. This gate is cylindrical, and is basically a hollowed out shaft, with a flat plate. So the adjustment for this is on the top of the glue pot and must be made WHILE THE GLUE POT IS WARM OR HOT. Depending on how your exact glue pot is designed, there will be some type of lever or screw that when you turn one way or another rotates the gate and opens or closes it against the glue roller. So, you simply look at the glue roller and see how much glue is on it. You want a good amount of glue, but you must be able to see the machine marks on the glue roller. If all you see is just glue, and cannot detect the machine marks on the roller, you have too much glue. So, close the gate some. If you don’t see any glue on the roller, open the gate. In the end, you have to run some long pieces and then tear off the tape or strips to make sure you’re getting glue continuously on the panel. When you tear off the tape or strips from the particle board panel, you should see fibers pulling out of the panel, if you see a fairly even amount of them coming out, then you glue pot and pressure rollers are dialed in.