.JPG) Since
1989
Sales Direct 505-220-1401
Since
1989
Sales Direct 505-220-1401
34th Year Anniversary
Woodworking Machinery Imported from Europe and Asia
Edgebander Glue Pot Adjustment Tutorial Page 3
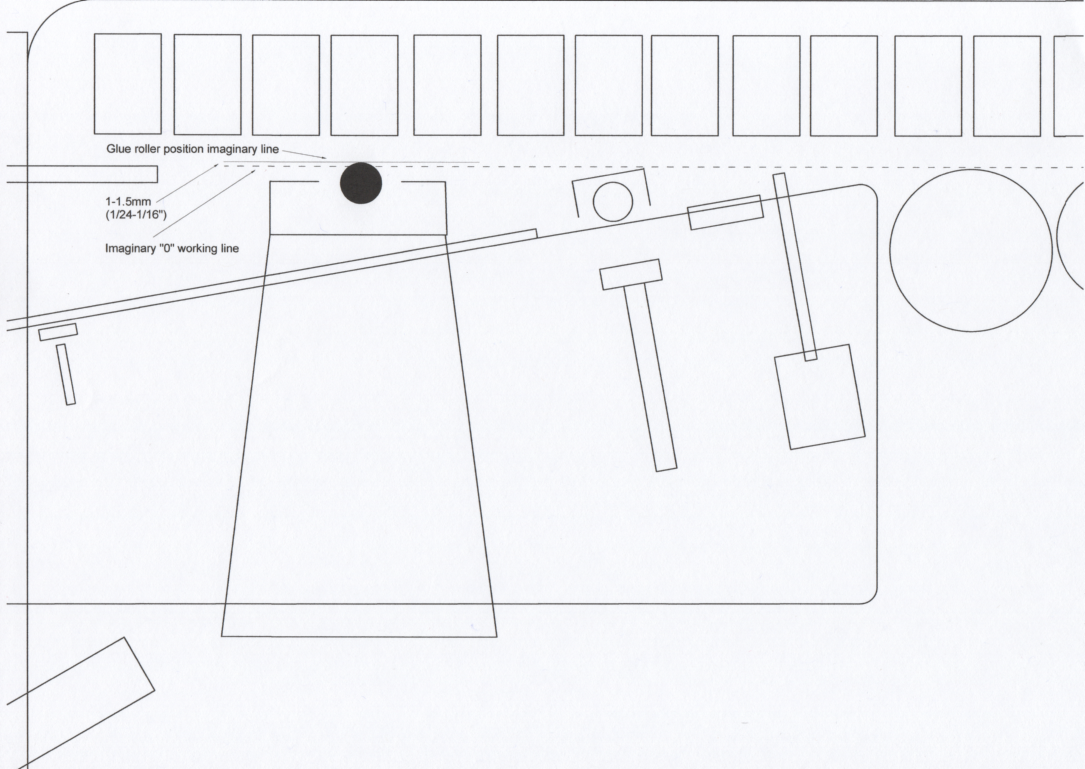
Continued from Page 2
There are a lot of different brand and specs of glue for edgebanders, but typically they normally require a temperature of around 180 – 220 degrees Celsius. I prefer to run around 190-200 Celsius whenever possible. All edgebanders have the ability to set the running temperature of the glue pot, but there are so many different types of temperature gauges, (mostly electronic digital these days), that you will have to refer to your edgebander manual to figure out how to adjust. Chances are your temperature settings are fine unless someone has really gone in and messed with them.
Pressure Rollers
As part of the glue pot adjustment tutorial, we are going to briefly cover setting the pressure rollers, because they are so strongly related. Once you have your glue pot adjusted, now you need to make sure your pressure rollers are adjusted as well. Many edgebanders have one large “DRIVEN” pressure roller, and 1 or 2 or 3 smaller pressure rollers. Again, please refer to the drawings on these pages. The driven roller sometimes has a clutch that can be adjusted to help with the tape/strip feeding depending on whether you are feeding wood strips or tape. Sometimes for wood strips you need the aid of a “DRIVEN” pressure roller. Most people don’t know this, but the smaller pressure rollers often have what is called opposite conicity. What that means is they are either slightly conical, or slightly tilted in opposite directions, so that if your edge of the board is not perfectly perpendicular, one of these small rollers puts more pressure on the top edge, and one of these small rollers puts more pressure on the bottom edge.
These pressure rollers are either spring loaded or pneumatically loaded. Most often these days they are pneumatically loaded. So to set them (please refer to drawings) we want their zero adjustment to be touching the imaginary zero working line going through the machine. To set that, pivot the glue pot or move the glue pot out of the working line (almost all glue pots have an adjustment to do this) so you can run a piece without getting glue on it, and watch from above while the piece passes the rollers (Make sure there is NO tape or strip on the piece). As the piece passes the glue rollers, just stop the machine, and check the rollers position. (Often the big roller has a separate adjustment than the small rollers) Next, adjust all the rollers so they just barely touch the piece. When you have them like you want, turn on the machine and run another piece without tape or strips, and as it comes to the rollers it should just barely make them want to turn. Once you have this, set your digital counters (Or ruler if no digital counters) to Zero. Now, when you apply thin tape, 0.4mm, the rollers will have about 0.4mm of backwards movement on them, which is basically perfect. Now, you can have this zero setting for tape, or change your digital counters or rulers to 0.4mm, whichever you prefer. Then when you put 1mm laminate, or 3mm tape, you just move the rollers using your digital readouts or rulers to 1mm, or 3mm respectively.
Next, just set your spring or pneumatic pressure correctly. Most modern machines use pneumatic pressure here, and are clearly marked as to what to set the pressure regulator at. Often times people really turn up the pressure too high to try and compensate for an incorrectly adjusted glue pot, but this usually does not work well, because again, with too high of pressure, you run the risk of pushing the piece off the zero working line, which will cause your trimmers, (especially your top and bottom edge trimmers) to do a bad job.
So, hope this helps, more tutorials coming in the future. Please don’t forget to check out our New Edgebanders for Sale Page.
Thanks,
Rusty Dils