.JPG) Since
1989
Sales Direct 505-220-1401
Since
1989
Sales Direct 505-220-1401
34th Year Anniversary
Woodworking Machinery Imported from Europe and Asia
Edgebander Service and Adjustment Tutorial Page 1
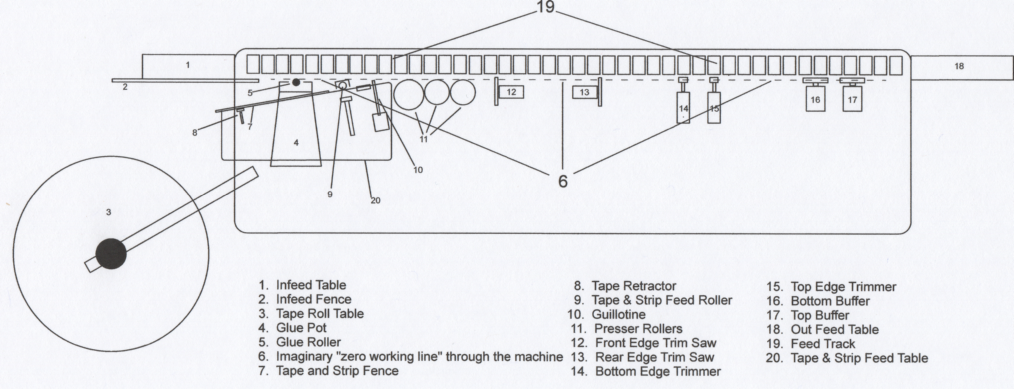
Typical Edgebander Drawing. Bird's-eye View (Viewing from Above)
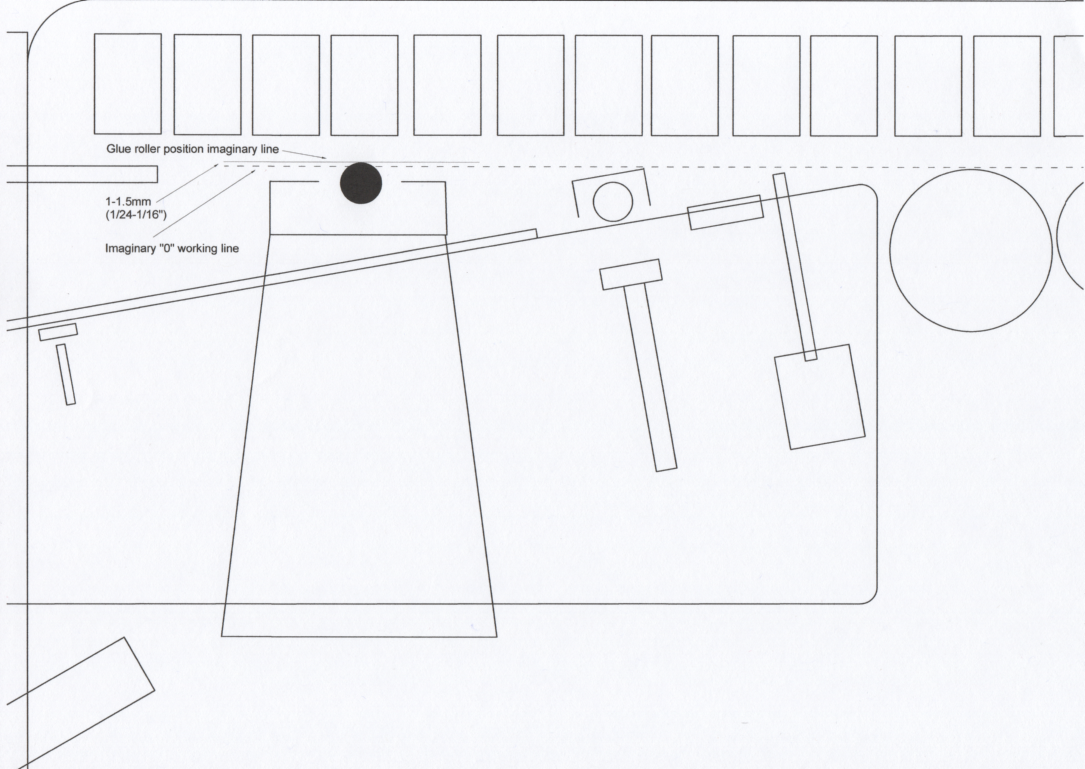
Typical Edgebander Drawing Glue Pot. (Magnified View for Clarity)
Edgebander Tutorial # 1, Adjusting the Glue Pot
AS ALWAYS, WEAR EYE
PROTECTION, AND GLOVES AND LONG SLEEVES WHEN WORKING WITH A GLUE POT, IT
IS VERY EASY TO GET BURNED!
In the process of doing hundreds and hundreds of edgebander repairs over the last 35 years, (14 different brands) what stands out to me the most is the basic lack of understanding from the operators and owners as to how their edgebander glue pot needs to be adjusted in relation to the working line through the machine.
To that end I offer up this basic edgebander glue pot adjustment tutorial. (Approximately 80% of the commercial duty edgebanders in use today use a glue pot and glue roller to apply the glue.) This tutorial is for those style machines.
This is a glue pot adjustment tutorial, NOT a glue pot rebuild tutorial. Glue pot rebuild takes an experienced technician, and will be discussed in a later tutorial.
To get a good quality bond of your edge, and to be able to properly end trim and top and bottom trim it is MANDATORY that your glue pot be properly adjusted. If not, you are sure to experience failure on your edges, and additionally have to use an extremely high amount of man hour’s hand trimming the edges. IT ALL STARTS WITH THE GLUE POT!
First things first, for the sake of this “adjustment” tutorial I am assuming your glue pot is in reasonable operating condition. That means the following.
- Most of or all of the heaters are working. (The heater for the glue roller MUST be working.)
- No or very little leaking from the BOTTOM of the glue pot where the glue roller comes out.
- Glue roller where the glue applies to the panel is clean and free from excess glue, burnt glue and other obstructions.
- Glue pot is free to pivot or move in and out of the working line at least 2 or 3mm, or around 1/8” simply by pushing it with a stick. (Don’t use your bare hand for this, because if the glue pot is warm you will get burned.
Ok, let’s get started, in this tutorial we will learn
- How to adjust the glue pot glue roller the proper distance out into the working line.
- How to adjust the PRESSURE on the glue pot roller.
- How to adjust the amount of glue the glue pot roller applies to the panel.
- The affect these distance and pressure adjustments have on the presser rollers and all the other stations through the machine.
- Setting correct temperature.
- How to adjust the pressure rollers once the glue pot is properly adjusted.
Gluepot heater test tutorial page click here